Installing Apache HTTP Server on Windows and Proxying to Tomcat

I have been working on Tomcat web applications and have always just accessed the pages directly on the port that Tomcat is serving.  Now I want to put an Apache HTTP server in front of Tomcat so I can access this page next to other pages that aren’t served by Tomcat.  Here are the instructions.

Since the Apache site doesn’t provide Windows binaries of the Apache HTTP server they must be downloaded from a third party site, I used Apache Haus HTTP Server Windows Binary Download page. After downloading the zip file I unzipped it and put it into a directory on my system.  The first thing you need to do is open up the conf/httpd.conf file to modify the configuration of the server.  The only required change is to update the SRVROOT definition, which basically is the pointer to where the unzipped folder is defined.  Make sure to use forward slashes instead of backslashes in the path.  Save the conf file and then run bin/httpd.exe.  If it started up correctly you can go to localhost:80 in your browser and an example page should load.

By default the server will look in the htdocs folder of the Apache Server installation for the pages in the site, but if you want to store them in a separate location for easy upgrade of the server then you can update the DocumentRoot and also the Directory elements of the httpd.conf file to point to any other folder on your system.

As for pointing to Tomcat you will need to do the following:
1. In the httpd.conf file make sure to include the load the proxy_module and the proxy_http_module.  They should be included in the file, but may be commented out.  Just uncomment them and they will load.
2. Next in the httpd.conf file add you need to add a ProxyPass and ProxyPassReverse, which will map specific web applications to the URL of the Tomcat applications. These will look like: ProxyPass /theApp http://localhost:8080/theApp
ProxyPassReverse /theApp http://localhost:8080/theApp
3. Update the Tomcat server.xml file so the connector element includes a proxyPort attribute specifying that requests from port 80 are proxied.

Start both servers up and you should be able to access your Tomcat web applications on port 80 now.

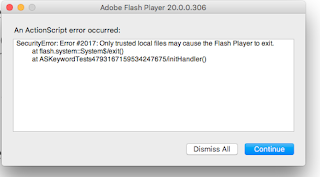
Flash Player Trusted Files

Trust Me Flash Player

I was attempting to build the new Apache Flex JavaScript project and ran into a problem when attempting to run the unit tests. The tests run on a standalone version of Flash Player and were definitely attempting to run, but I was receiving a Security Error #2017 “Only trusted local files may cause the Flash Player to exit.” I could dismiss the error, but there were lots of tests and each test would pop up the same pop up. I vaguely knew that Flash Player has security limitations when it comes to running swf applications on the local file system, but since I usually run Flex unit tests via the FlexMojos maven plugin I had never seen this before.

Tough Search

I search and searched the internet and eventually found the answer to the problem buried in an Adobe help page . Hopefully my page will be a little easier to find.

The Solution

Just in case the Adobe page disappears I will also post the fix here. Flash Player allows you to configure a set of trusted directories for swf files, once you define them they will open without the Security Error.
  1. First you have to find the Flash Player #Security directory for your OS
    1. Windows Documents and Settings\username\Application Data\MacroMedia\Flash Player#Security
    2. Mac OS X /Users/username/Library/Preferences/Macromedia/Flash Player/#Security/
  2. Create a folder called FlashPlayerTrust inside the #Security folder.
  3. Create a new file in the FlashPlayerTrust directory using a text editor, and save it as myTrustFiles.cfg.
  4. You can use any unique name for your configuration file.
  5. Locate the directory where you test Flash applications.
  6. Type or paste each directory path (any directory path on your hard disk) on a new line in the file. You can paste multiple directory paths on separate lines. When you finish, your file looks similar to the following example: /Users/myuser/Development/source/swfs
  7. Save your changes to myTrustFiles.cfg

Moving From Adobe Flex 4.6 to Apache Flex 4.13 with FlexMojos

I was very excited for the handover of the Flex project from Adobe to an Apache project.  After a few years I was finally given permission to move our product from Adobe Flex 4.6 to Apache Flex 4.13.  Here are my notes on the process in the hopes that they help somebody else in the same situation.

For some background our product was compiling using FlexMojos 4.0-RC1 and Adobe Flex version 4.6.  I decided to go with the least moving parts approach, which meant I made the upgrade in two steps.  First I upgraded the FlexMojos version to version 6.0.1 and then I upgraded to FlexMojos 7.0.1 and Apache Flex 4.13.

Up first was the upgrade to FlexMojos 6.0.1.  This version of FlexMojos supports both Adobe and Apache SDK’s, but due to difficulties in supporting two different group ids, it uses the com.adobe groupID for all types of artifacts.   I followed details available on FlexMojos 6.0 wiki page and its child page specifically for migrating to FlexMojos 6.

  1. Upgrade to Maven 3.0.5 (required for FM6)
  2. Changed the FlexMojos version property in my parent pom file to 6.0.1
  3. Changed the group id for the FlexMojos plugin from org.sontaype.flexmojos to net.flexmojos.oss
  4. Update the playerglobal dependency 
    1. Group ID = com.adobe.flash.framework
    2. Artifact ID = playerglobal
    3. Remove version that points to Flex SDK
    4. Update classifier tags to version
Once I made these small changes I was up and running with the new improved FlexMojos 6.0.1.  After that I moved on to the bigger task of Apache Flex 4.13.  I downloaded the Apache Flex installer and installed the SDK locally and then used the Apache Flex mavenizer, lots of details on that in the Apache Flex Wiki. I won’t go into details, but I basically downloaded the source for the project and build the maven deployer.  Since I wanted to test locally I did modify the deployer slightly so it would just install the artifacts to my local repository first.  Overall it was pretty straightforward.

Next I updated my various pom files for FlexMojos 7.0.1 and Apache Flex 4.13.  Here are the steps:
  1. Update the flexmojo.version property in the root pom to 7.0.1
  2. Update the flex sdk version property in the root pom to 4.13.0.20140701
  3. Updated the old groupID of com.adobe.flex to org.apache.flex for several dependencies.  In my case there were some instances where the old group id was valid because I had some automation libraries that I still don’t have artifacts for and also for some exclusions.
  4. Remove the license jar dependency.
  5. Updated the flexframework artifact name to framework and fixed the group id for it to org.apache.flex
  6. Updated the theme dependency so it doesn’t have a classifier and instead of the type being css it is now swc.
  7. Updated the theme dependency’s group id to org.apache.flex.framework.themes
  8. Updated all the Flex dependencies from the scope of “caching” to “rsl”, because there aren’t any swz files for Apache Flex libraries
  9. Updated the group id for all automation libraries to org.apache.flex.framework.automation
  10. Remove the “_rb” from the automation artifact names and added a new classifier of “.rb”
All of the above changes got me 99% of the way there and I was able to build the project successfully with Maven, unfortunately I ended up with a runtime problem.

When loading the application in a browser I received the dreaded VerifyError 1053 “invalid override of the removeItem() method.  As it turns out the third party library I was using had a removeItem() method on a class that extended from ListCollectionView AND in the same method was added to Apache Flex 4.10.  

Of course I didn’t just take the error message at its face value and spent a few days trying to figure out the problem.  Once I did it was just a matter of downloading the source for the specific version of the third party library, changing the name of the method, rebuilding a “new” version and deploying it to my maven repository.  Of course if I didn’t have access to the source I would have been in trouble. After that the application behaved as it did before the upgrade.