Flash Player Issue with Edge Browser in Windows 10 Anniversary Update

I recently spent a couple days debugging an issue with our Flash application in Microsoft’s Edge browser.  Several developers were updated to the Anniversary update for Windows 10 and if you tried to load the page with our Flash application it wouldn’t display and right clicking would show the “Movie not loaded” message.  Everything worked fined in Chrome, IE and Firefox.  I verified that Flash applications on the internet worked to eliminate that part of the problem.

Things go weird when I tried accessing the application from a different machine and it worked fine.  Further testing showed that the application would load fine on port 80, but not port 8080.  I was really narrowing it down and finally found that in the Anniversary update a new setting was added to the about:flags page called “Allow Adobe Flash Player localhost loopback”.  After turning this on and restarting the browser the application loaded fine.  


Angular Proof of Concept (Part One)

I recently went through the process of building a simple application using the Angular framework and wanted to document some of my experience to possibly help others considering the framework. My day job for the last ten years has mostly involved building Flash applications using the Apache Flex framework and as a result my experience with HTML, JavaScript and CSS has been limited. In September 2016, I attended the Angular Summit Boston 2016 and learned a lot about the framework and how I might use it. A few months later I finally found some time to give it a shot.

To TypeScript or Not To TypeScript

At the Angular Summit there were two almost equally divided camps when it came to language choice. The JavaScript people seemed skeptical of TypeScript and were very comfortable with JavaScript. The TypeScript people on the other hand preferred the simpler syntax and more strongly typed nature of TypeScript. I decided to start with JavaScript Since I had some knowledge of it and also like that the browser would be working with the actual files I created rather than some on the fly transpiled files.

Once the language decision was behind me I walked through the Angular JavaScript Quick Start and quickly had a sample application running on my local machine. I used the Microsoft Visual Studio Code application because it was free and easy to use. Once I had the sample application up and running I started to make changes based on my needs. It was pretty easy to figure out the patterns and I was able to create my own components pretty easily. I did have some trouble getting the syntax of the JavaScript correct because of the hoops you need to jump through in order to support the complex class structures required by Angular. Here is an example of a simple module class and all its curly brace and bracket fun.

(function(app) {
app.AppModule =
ng.core.NgModule({
imports: [ ng.platformBrowser.BrowserModule ],
declarations: [ app.AppComponent ],
bootstrap: [ app.AppComponent ]
})
.Class({
constructor: function() {}
});
})(window.app || (window.app = {}));

Struggles with Server Calls

After completing the screens I moved on to trying to set up some services that would make calls to a simple REST API set up on my server. I went searching for examples on the Angular site, but like most of the other portions of the tutorial there isn’t a JavaScript example yet only TypeScript. I looked around the web a little bit and scraped together some information, but in the end I was forced to look at the TypeScript examples and then in my head transpile them to JavaScript. After lots of trial and error I learned how to use Promises with JavaScript and made the http get call to one of my REST endpoints. The browser sent the request to the server, but the server wasn’t having any of that nonsense.

My lack of experience with standard web technologies now started to catch up with me at this point as I fumbled through the process of updating my Apache Tomcat server to accept cross domain requests from my Angular application on a different port. A few hours of tweaking CORS filters in my web.xml file and a couple tweaks to my http get call resulted in a successful retrieval of text from the server. The next endpoint was authenticated so I once again consulted the TypeScript tutorial and figured out how to pass the Authentication data in the http get call. The TypeScript example looked so much more straightforward because it used import statements to bring in special classes for the Header, while the JavaScript I built used plain old objects.

All Downhill

Once I made it over this last hurdle I was able to finish the proof of concept with relative ease. I found debugging using Google Chrome’s built in developer tools was straightforward and helped me around some simple issues. The error messages provided by Angular were much better than I remember from what were reported back in the fall, which helped me fix some random issues I would face when adding new components. Compared to compiling Apache Flex in Flash Builder the whole experience of quickly updating a file and being able to test the change within a few seconds was a breath of fresh air. I found the process of adding new components was pretty fast and the segregation of the templates (view) from the components (model) was great. Overall using Angular has been a great experience and meshes well with my Apache Flex experience.

Of course this isn’t the end of the story, because I had a few more things I wanted to learn about Angular. In the weeks that followed I worked on switching from JavaScript to TypeScript, integrated some third party JavaScript widgets and also switched to using the fantastic Angular CLI. I am happy to say things only got better!

Browser Zoom Factor

In the summer of 2015 I noticed our Flash application looked slightly different in the Chrome browser. Since it was very subtle and I usually develop using IE 11, it didn’t really pique my interest. Around the same time I had also heard some complaints about blurry images on some newer laptops.

Fast forward to February 2016…

While researching a bug related to a Flash Player change, see my post Flash Problems I uncovered a new feature that was slowly added to Flash Player over a few different versions called, Browser Zoom Factor. The feature will scale a Flash application using the browser’s scale setting. It was first introduced in Flash Player 18, but at that time it was always on for supported browsers and there was no way to shut it off. In the fall of 2015 in Flash Player 19 developers were given a parameter for disabling the zoom factor.

It turns out the weirdness I was seeing in Google Chrome was caused by the browser zoom factor. By default my installation was always zooming to 85%, which in turn zoomed the application to 85% making the logo a little less clear and making the view a little bit smaller than in IE 11. Of course my instinct was to turn this off, because I didn’t want somebody to unexpectedly see the application with blurry images, so I added the special parameter to shut browser zoom factor off.

Fast forward three weeks…

Our IT department started rolling out Microsoft SurfaceBook to a few employees for a trial and within a couple days I received a complaint that our application was “unusable” on a high resolution display. I ran over to see the situation, because I had never seen our application on a high resolution display. He was right the application was so small on the SurfaceBook and was extremely hard to use. At that point I realized I had forgotten about using the browser zoom factor in the other direction.

In the end I turned the browser zoom factor feature back on for our application so user can zoom in or out as needed. I know at some point a defect will be filed about the images looking terrible, but at least push it back and have the user not zoom in so much.

Flash Player Trusted Files

Trust Me Flash Player

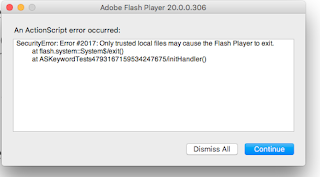
I was attempting to build the new Apache Flex JavaScript project and ran into a problem when attempting to run the unit tests. The tests run on a standalone version of Flash Player and were definitely attempting to run, but I was receiving a Security Error #2017 “Only trusted local files may cause the Flash Player to exit.” I could dismiss the error, but there were lots of tests and each test would pop up the same pop up. I vaguely knew that Flash Player has security limitations when it comes to running swf applications on the local file system, but since I usually run Flex unit tests via the FlexMojos maven plugin I had never seen this before.

Tough Search

I search and searched the internet and eventually found the answer to the problem buried in an Adobe help page . Hopefully my page will be a little easier to find.

The Solution

Just in case the Adobe page disappears I will also post the fix here. Flash Player allows you to configure a set of trusted directories for swf files, once you define them they will open without the Security Error.
  1. First you have to find the Flash Player #Security directory for your OS
    1. Windows Documents and Settings\username\Application Data\MacroMedia\Flash Player#Security
    2. Mac OS X /Users/username/Library/Preferences/Macromedia/Flash Player/#Security/
  2. Create a folder called FlashPlayerTrust inside the #Security folder.
  3. Create a new file in the FlashPlayerTrust directory using a text editor, and save it as myTrustFiles.cfg.
  4. You can use any unique name for your configuration file.
  5. Locate the directory where you test Flash applications.
  6. Type or paste each directory path (any directory path on your hard disk) on a new line in the file. You can paste multiple directory paths on separate lines. When you finish, your file looks similar to the following example: /Users/myuser/Development/source/swfs
  7. Save your changes to myTrustFiles.cfg

Flash Problems

Works for Me

Last week I received an email from a QA resource who was getting an error in the Flash Player debugger when performing a very basic action in our Flash application. I quickly looked at the stack trace he provided and tried to reproduce the issue without much luck. I didn’t think anything of it since sometimes QA environments have been known to be suspect.

Fast forward a week and I was pulled into an urgent customer issue, where they were seeing the application become unresponsive when performing some very basic tasks. I logged into the system, where the error was occurring, using IE 11 which has a debugger version of Flash Player and everything worked fine. I then tried it out with Chrome and was easily able to reproduce the issue, same thing with Firefox. I then tried the same thing on a local developer build and got the same results, at first glance there seemed to be a problem with the debugger version of Flash Player. It seemed odd, but they are slightly different versions of Flash Player and it wouldn’t be unheard of.

I spent the next several hours trying pinpoint the issue using Flash Builder and Google Chrome. I was able to comment out some code to make the issue go away, but it wasn’t immediately obvious where things were going wrong. I then remembered that my debugger version of Flash Player was several versions older than the auto updated version in Chrome, version 17 vs version 20. I upgraded the Flash version in IE up to the last release from February 9th, not coincidentally this was the day before the customer saw the issue. To my surprise I was able to reproduce the error and since I was using the debugger version of Flash was shown a stack trace which led me directly to the problem.

The Error

ArgumentError: Error #1508: The value specified for argument RectangleObject is invalid.
at flash.display::DisplayObject/set scrollRect()
at spark.components.supportClasses::GroupBase/set scrollRect()
at spark.components::Group/set scrollRect()
at spark.layouts.supportClasses::LayoutBase/updateScrollRect()
at spark.layouts.supportClasses::LayoutBase/scrollPositionChanged()
at spark.layouts.supportClasses::LayoutBase/set horizontalScrollPosition()
at spark.components.supportClasses::GroupBase/set horizontalScrollPosition()

The error was occurring when we were setting the horizontalScrollPosition on a scroller to a very large number (int.MAX_VALUE to be exact). Now I know using this value is not a good idea and should be a red flag, but Flash Player had been okay with it up until the latest version. I installed the version from late January and didn’t have a problem, so it was tied directly to version 20.0.0.306. I looked at the release notes from Adobe, but nothing jumped out at me. It looks like for some reason they added some new validation for the Rectangle object that is passed into DisplayObject.scrollRect() to now throw an error. Of course since Flash Player is closed software I will never know what the limits are for the horizontal scroll position.

The Fix

Since I knew what was going on I was quickly able to commit a fix, which now sets the scroll position to the width of the viewport rather than the maximum integer value. However, the code fix wasn’t going to help the version of the software that had already been released. Since Flash has had so many security problems most browsers now will automatically update, which is why this happened in the first place. The workaround is to uninstall the current version and downgrade to the previous version and shut off automatic updates. In the case of Chrome it is not possible to shut off automatic updates for the Flash Player included with the browser, instead you have to install a separate install of Flash Player, disable the default and enable the new install.

Moving From Adobe Flex 4.6 to Apache Flex 4.13 with FlexMojos

I was very excited for the handover of the Flex project from Adobe to an Apache project.  After a few years I was finally given permission to move our product from Adobe Flex 4.6 to Apache Flex 4.13.  Here are my notes on the process in the hopes that they help somebody else in the same situation.

For some background our product was compiling using FlexMojos 4.0-RC1 and Adobe Flex version 4.6.  I decided to go with the least moving parts approach, which meant I made the upgrade in two steps.  First I upgraded the FlexMojos version to version 6.0.1 and then I upgraded to FlexMojos 7.0.1 and Apache Flex 4.13.

Up first was the upgrade to FlexMojos 6.0.1.  This version of FlexMojos supports both Adobe and Apache SDK’s, but due to difficulties in supporting two different group ids, it uses the com.adobe groupID for all types of artifacts.   I followed details available on FlexMojos 6.0 wiki page and its child page specifically for migrating to FlexMojos 6.

  1. Upgrade to Maven 3.0.5 (required for FM6)
  2. Changed the FlexMojos version property in my parent pom file to 6.0.1
  3. Changed the group id for the FlexMojos plugin from org.sontaype.flexmojos to net.flexmojos.oss
  4. Update the playerglobal dependency 
    1. Group ID = com.adobe.flash.framework
    2. Artifact ID = playerglobal
    3. Remove version that points to Flex SDK
    4. Update classifier tags to version
Once I made these small changes I was up and running with the new improved FlexMojos 6.0.1.  After that I moved on to the bigger task of Apache Flex 4.13.  I downloaded the Apache Flex installer and installed the SDK locally and then used the Apache Flex mavenizer, lots of details on that in the Apache Flex Wiki. I won’t go into details, but I basically downloaded the source for the project and build the maven deployer.  Since I wanted to test locally I did modify the deployer slightly so it would just install the artifacts to my local repository first.  Overall it was pretty straightforward.

Next I updated my various pom files for FlexMojos 7.0.1 and Apache Flex 4.13.  Here are the steps:
  1. Update the flexmojo.version property in the root pom to 7.0.1
  2. Update the flex sdk version property in the root pom to 4.13.0.20140701
  3. Updated the old groupID of com.adobe.flex to org.apache.flex for several dependencies.  In my case there were some instances where the old group id was valid because I had some automation libraries that I still don’t have artifacts for and also for some exclusions.
  4. Remove the license jar dependency.
  5. Updated the flexframework artifact name to framework and fixed the group id for it to org.apache.flex
  6. Updated the theme dependency so it doesn’t have a classifier and instead of the type being css it is now swc.
  7. Updated the theme dependency’s group id to org.apache.flex.framework.themes
  8. Updated all the Flex dependencies from the scope of “caching” to “rsl”, because there aren’t any swz files for Apache Flex libraries
  9. Updated the group id for all automation libraries to org.apache.flex.framework.automation
  10. Remove the “_rb” from the automation artifact names and added a new classifier of “.rb”
All of the above changes got me 99% of the way there and I was able to build the project successfully with Maven, unfortunately I ended up with a runtime problem.

When loading the application in a browser I received the dreaded VerifyError 1053 “invalid override of the removeItem() method.  As it turns out the third party library I was using had a removeItem() method on a class that extended from ListCollectionView AND in the same method was added to Apache Flex 4.10.  

Of course I didn’t just take the error message at its face value and spent a few days trying to figure out the problem.  Once I did it was just a matter of downloading the source for the specific version of the third party library, changing the name of the method, rebuilding a “new” version and deploying it to my maven repository.  Of course if I didn’t have access to the source I would have been in trouble. After that the application behaved as it did before the upgrade.

Getting Flex and JBoss to use SSL

I have spent the last 7 or so hours at work trying to configure our Flex client to connect to our JBoss 4.2.3 server using SSL.

Now that I have figured it out here are the steps to make it work. The assumption is you have JBoss 4.2.3 installed and are able to access a web app on port 8080 over plain old http.

Types of SSL
JBoss supports at least two implementations of SSL:
Java Secure Socket Extension (JSSE) which uses the Java Runtime.
Apache Portable Runtime (APR) which uses OpenSSL.

Based on my version I am going to go out on a limb and say by default JBoss 4.2.3 uses APR out of the box.  You can verify this by looking in the server.xml found in your JBoss installation at /server/default/deploy/jboss-web.deployer/server.xml. At the very top of the file is a Listener tag for the AprLifecycleListener, which by default has the SSLEngine turned on. Below are the instructions for installing using both APR and JSSE.


APR SSL Setup Instructions
Generating a Private Key and Certificate
In order for all this SSL craziness to work you need to generate a private key and a certificate.  These can be generated using the OpenSSL command line tool.  All can be generated locally, but typically the certificate is generated by a Certificate Authority.  The following instructions show you how to create a self signed certificate. The private key and certificate will be kept in the /server/default/conf directory.

1. Open  a command line tool and navigate to /server/default/conf
2. Generate a private key: Execute openssl genrsa -des3 -out server.key 1024
3. Generate a certificate request: openssl req -new -key server.key -out server.csr
4. Generate a self signing certificate: openssl x509 -req -days 365 -in server.csr -signkey server.key -out server.crt
5. Voila you now have a private key and certificate in the conf directory called server.keystore

Configuring JBoss For SSL
The {jboss}/server/default/deploy/jboss-web.deployer/server.xml file now needs to be modified to connect on https.  This requires the addition of a Connector tag in the file specifying the port, keystore location and also the keystore password.  

1. Open {jboss}/server/default/deploy/jboss-web.deployer/server.xml in your favourite text editor.
2. By default the Connector for https is commented out (you can find it by searching for 8443)
3. Add a new Connector to the file:
<Connector port=“8443” SSLEnabled=“true”
    maxThreads=“150” scheme=“https” secure=“true”
    SSLCertificateFile=“${jboss.server.home.dir}/conf/casenet.crt” 
    SSLCertificateKeyFile=“${jboss.server.home.dir}/conf/casenet.key”
    clientAuth=“false” sslProtocol=“TLSv1” />

4. You can modify the port as you like and also update the SSLCertificateFile and SSLCertificateKeyFile as is appropriate.
5. Save the file.


JSSE SSL Setup Instructions
Generating a KeyStore
In order for all this SSL craziness to work you need to generate a keystore for your server.  This keystore is created using the Java keytool executable.  The keystore will be kept in the /server/default/conf directory.

1. Open  a command line tool and navigate to /server/default/conf
2. Execute keytool -genkey -alias tomcat -keyalg RSA -keystore server.keystore
3. Enter ‘123456’ as the password when prompted.
4. You will also be prompted to enter your name, organizational unit, organiation, city, state and country. Enter the appropriate values for you.
5. When prompted to enter the key password just hit enter to make it the same as the keystore password.
6. Voila you now have a key in the conf directory called server.keystore

Configuring JBoss For SSL
The {jboss}/server/default/deploy/jboss-web.deployer/server.xml file now needs to be modified to connect on https.  This requires the addition of a Connector tag in the file specifying the port, keystore location and also the keystore password.  In order to use JSSE we need to override the default protocol with org.apache.coyote.http11.Http11Protocol. This will cause it to override the APR SSL

1. Open {jboss}/server/default/deploy/jboss-web.deployer/server.xml in your favourite text editor.
2. By default the Connector for https is commented out (you can find it by searching for 8443)
3. Add a new Connector to the file:
<Connector port=“8443” SSLEnabled=“true”
protocol=“org.apache.coyote.http11.Http11Protocol”
maxThreads=“150” scheme=“https” secure=“true”
keystoreFile=“${jboss.server.home.dir}/conf/server.keystore” keystorePass=“123456” clientAuth=“false” sslProtocol=“TLS” />

4. You can modify the port as you like and also update the keystoreFile and keystorePass as is appropriate.
5. Save the file.


Verify Results for Either SSL
Now that you have created a keystore and also added a new connector you should be able to start up JBoss without errors. To verify you can now go to https://{server name}:{port}/{webapp}. You will be prompted to accept the certificate and once you accept the page should load.

Here are two very helpful sources: Steps for Building A Hello World Web App,  Apache Tomcat SSL How ToJBoss Community SSL Config, and How To Create a Self Signed Certificate

Updating the Flex Client
We use Granite and Gravity for transferring objects between the Flex client and the JBoss server.  All you need to do is update the services-config.xml Granite file.

Locate the channeldefinition tags and update them to use the secure channel classes and also update the URL to include https.
<channel-definition id=“myApp-graniteamf” class=“mx.messaging.channels.SecureAMFChannel”>
<endpoint uri=”localhost/myApp/gra…
class=“flex.messaging.endpoints.SecureAMFEndpoint” />
</channel-definition>