iOS 11 for iPhone

Today is the annual update all your iOS devices day, thanks to the release of iOS 11, watchOS 4 and tvOS 11.  I have been running the public beta of iOS 11 on my iPad for over a month and on my iPhone for about 2 weeks.  Here is a quick review of the biggest changes in iOS 11 for iPhone, because the scale of the changes on the iPad is too big for anything quick.


Control Center

The most dramatic change for the iPhone is the new Control Center.  You may not know its name, but  if you have an iPhone it is likely that you swiped up from the bottom of the screen to reveal a set of controls for turning on airplane mode, or most likely to use the flashlight.  It is the same area where you may have seen music controls when you were trying to find the flashlight and only after trial and error realized you could swipe right to find the page with the flashlight.

In iOS 11 the multi page Control Center is being replaced with a single page that is now much larger and contains lots of buttons of different shapes and sizes.  
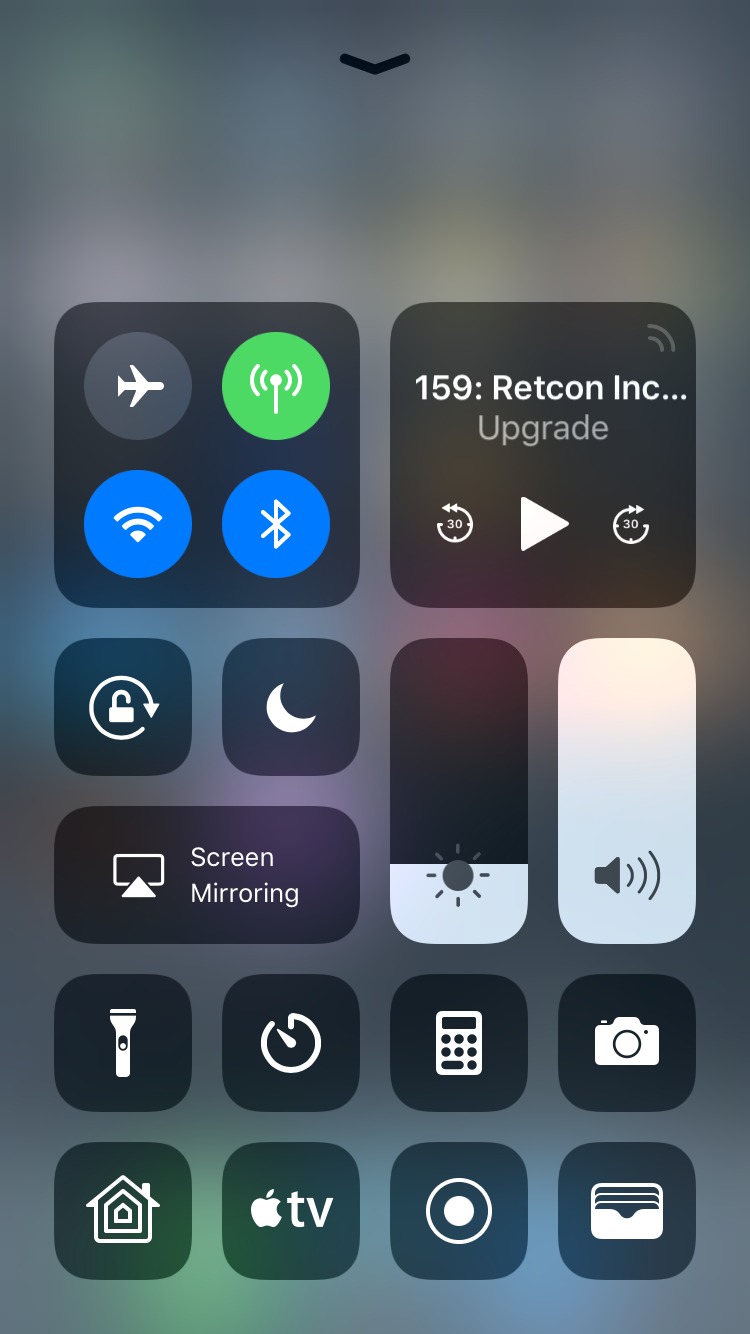
It takes a while getting used to all the new controls and what they do, but after a week or so it becomes second nature.  Simply tapping on the controls will perform the expected action, but if you long press or 3D Touch on some of they will reveal a more detailed control.  For example, long pressing on the flashlight will give you three options for brightness.  

Messages

Not a lot has changed in the Messages app, but since it is used by a lot of people I wanted to point them out.  In iOS 10, the introduction of apps in Messages was a tent pole feature and they invaded the Messages app.  One downside to this was you had to do an extra tap to attach or take a pictures.  I know it doesn’t seem like much, but it really annoyed me.  In iOS 11 apps in Messages are featured differently and as a result the camera is now only a single tap away.
Now instead of using an arrow button to reveal the camera, the text input field is a little smaller and the icons for the camera and app store are always displayed.  A new row of apps is always displayed to help encourage their use, but in a nice and subtle way.  My only gripe about this new interface is once you type a certain number of characters the input field grows and it always “startles” me as the display changes.

Live Photos

One of my favorite features on my iPhone 6S is Live Photos.  I almost always forget to record video of different events and it is so nice to be able to see a brief snippet of video that I “accidentally” captures.  I generally leave Live Photos turned on, because why not.  In iOS 11, Live Photos is getting a couple upgrades.  My favorite is the new Live Photo Effects: Loop, Bounce or Long Exposure.  I know these already exist in apps like Instagram and Snapchat, but it is nice to be able to apply these effects after they are taken.  
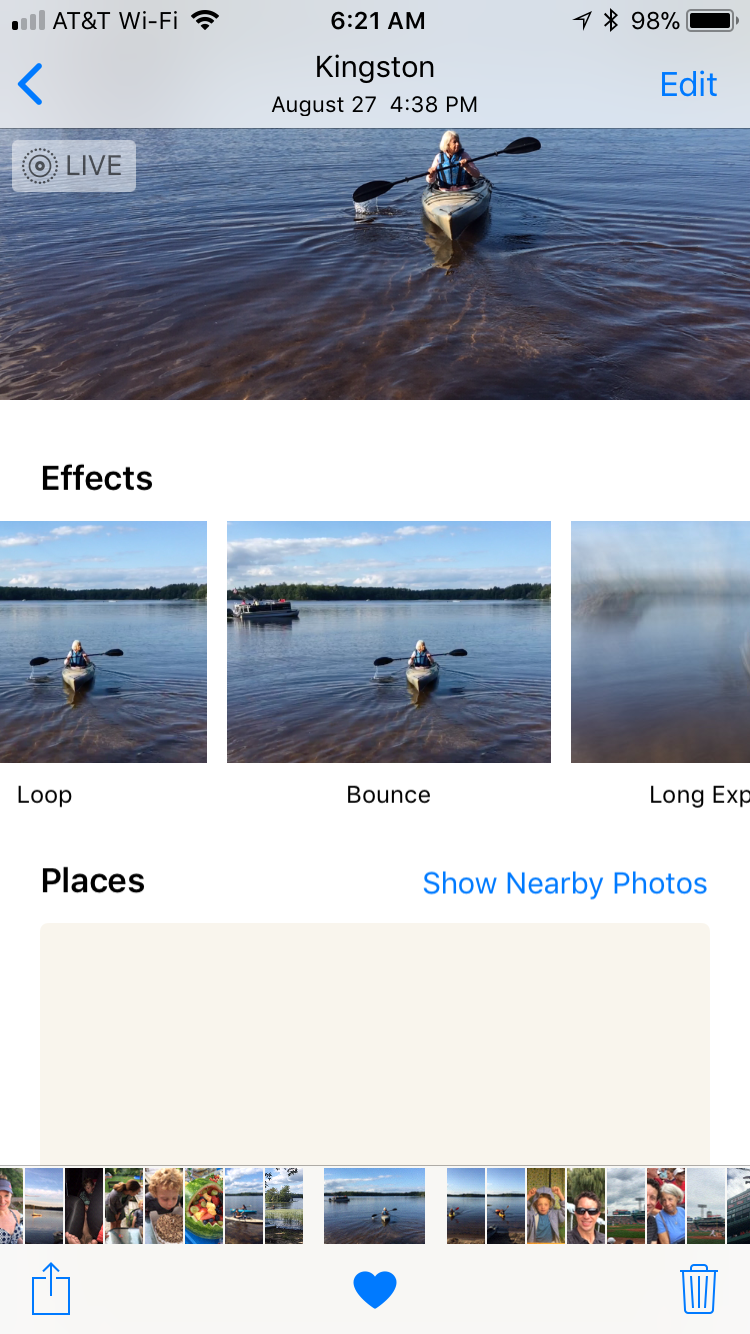
To access the Effects just slide the Live Photo up to reveal a live running example of what it will look like.  There is a slight delay as the effects are applied so be patient, but once they have loaded you can tap on the effect you like and the photo will be updated.  The first option is Loop, which tries to create a looping video that repeats over and over again.  The second option is Bounce, which will play the video forward for a certain amount of time and then reverse it for the same amount of time.  The last one is Long Exposure, which will basically overlay all the different frames together as if you left the shutter on your camera open for a long exposure photo, this works best for things like waterfalls or night shots.

Other Random Changes

Above are the changes I found to be most notable on the iPhone, but here are some more quick things you may notice.
  • Taking a screenshot will now show a thumbnail in the bottom right corner of your screen for a few seconds.  You can tap on it to mark up the thumbnail and choose to share it, save to Photos or delete it.
  • Screen recording is a control that is available in the new Control Center.  It is not in Control Center by default, but you can add it in Settings.  Once it is on you can record what you are doing on the screen and it will be saved to Photos.
  • Swiping down from the top will show the lock screen.
  • iCloud Family Sharing of data!!!  Now you can share your iCloud storage data with your entire family, so just spend $2 a month for 200GB and everybody will have plenty of space.
  • The App Store is completely redesigned.
UPDATE: Forgot to include Do Not Disturb While Driving, which will automatically turn on whenever your iPhone detects you are driving.  Any messages you receive will auto reply with a message that you are driving and the ability for the sender to resend with the word URGENT to bypass it.

Getting Video into iMovie on the iPad without iCloud

A few months ago I wrote a post, My Kingdom for a Local iPad Data Store, talking about how I wanted to be able to use iMovie on the iPad to edit my drone videos. The problem was that in order to get the videos into iMovie they had to be in iCloud Photo Library or in iCloud Drive, but I didn’t want them to be uploaded and then maybe downloaded from the cloud because they are large files. Over the weekend I had an epiphany and figured out how to work around this by doing some offline file shuffling.

  1. Turn on Airplane mode to prevent any internet connection from occurring.
  2. Connect a Lightning to USB adapter with an attached SD card reader to the iPad. 
  3. Insert and SD card into the card reader or in my case a Micro SD card. 
  4. The Photos app will launch and prompt you to do an import. 
  5. Import any of the videos you want and then choose to keep or delete them on the card. 
  6. Unplug the Lightning to USB adapter. 
  7. In the Photos app go to the “Last Import” album. 
  8. Tap the Select button to enable selection mode and select all of the videos. 
  9. Tap on the “Share” button (the box with the arrow coming out of it). 
  10. In iOS 11 tap on the “Save to Files” action and in iOS 10 select the “Upload to iCloud Drive” action. This will copy the file to iCloud Drive. 
  11. In the Photos app tap the Select button again and select all the videos and this time delete them. 
  12. Go to the “Recently Deleted” album and delete all the videos from Photos (just in case these would get uploaded to iCloud Photo Library).
  13. Now open up iMovie. 
  14. Create a new movie and import all of your videos from iCloud Drive. 
  15. Click Done to go to the Summary screen just to make sure everything is “Saved”.
  16. If you are using iOS 11 open up the Files app and if you are using iOS 10 open up iCloud Drive. 
  17. Delete all of the videos from iCloud Drive. 
  18. Go to the Recently Deleted view and also delete them from there. 
  19. Finally open the Settings app. 
  20. Go into the settings for the current user, which should be the top option. 
  21. In the user menu select iCloud. 
  22. In the iCloud menu you can choose which apps will save their data to iCloud. 
  23. Turn this off for the iMovie app. 
  24. Now turn off Airplane mode and you are ready to work on your movie. 
The iCloud Drive/Files storage part seems a bit excessive, but was necessary because any videos imported to iMovie from the iCloud Photo Library stop working if you delete them.  Importing from iCloud Drive/Files on the other hand puts a copy in the iMovie app’s local storage.

Intro to Smart Home Stuff

Last month I spent a few days at my dad’s house in Florida and was surprised by how much home automation he had in place. The front door would automatically lock after a couple minutes, the lights were on timers and the garage lights had motion sensors. I immediately felt like I was falling behind in the technology race with my own father. The good news for me was that most of his devices were programmable, but they couldn’t be controlled from another device like a phone or one of the “ladies in a cannister”. I knew once I got home it was time to start planning my first foray into the world of the “smart” home.

Since I am an Apple devotee I started by researching Apple HomeKit. It seems that support for HomeKit from various vendors has been very slow due to the hoops they have to jump through in order to get approved by Apple. On the surface this seems problematic, but I like to think the adoption is a bit slower because they have placed higher standards on the vendors to ensure a more secure smart home experience.

I also looked into Alexa because I knew it supported many more devices, but my impression was that there wasn’t a consistent platform for connecting devices. In some cases you have to use the Echo skills functionality for the specific device, and in other cases you have to leverage IFTTT to trigger devices. Apple on the other hand has created an additional layer on top of the individual device apps that helps give a consistent way of controlling all the different devices. Siri support helps provide a little more flexibility than you get with Alexa, as is outlined in this great article from CNET, Google Home vs Amazon Echo. It also seemed a safe bet was to get stuff that supported Apple HomeKit, because they would also support all the other platforms too.

Once I settled on HomeKit it was time to find a device to try out in my home. I started thinking about my daily routine and what parts of it would be made easier and bedtime stood out in my mind. After sitting in the living room each evening I usually shut a bunch of lights off downstairs, upstairs I switch on the light to the room so I can turn on my bedside light and then go back out to switch the bedroom light off. I focused on this scenario and started researching online.

I went to the Apple Store page and searched through the HomeKit accessories to get an idea about what products were available. My bedside table lamp is from IKEA so it has the small E14 bulbs, so I had to find a “smart” outlet for that part of my plan. I settled on the iHome iSP5 because it was on sale from Amazon and was shaped so you could still plug other stuff in above or below it. For the downstairs lights I went with a Hue Starter Kit because they were the most well known brand available right now. I went with this particular starter kit, because it included a remote switch so you didn’t need a device to turn on the lights.

The Hue Starter kit was the first thing I received so I quickly unboxed them and replaced the two “dumb” bulbs in the recessed light over the fireplace with the new bulbs. I plugged the Hue Hub into my router and downloaded the Hue app. The setup in the app was pretty easy and was happy to see that signing up for a Hue account was optional. Next I went to the app store to download the Home app because I had removed it from my iPhone. The home app set up was easy, I created a room and was able to group the two lights together so they would be controlled as a single accessory. Controlling the lights from the control center was great and the ability to dim them by using a 3D touch was a neat feature. The Home app was able to dim the bulbs, but unlike the Hue app I wasn’t able to change the shade of white for the bulbs. I am not sure if the API just doesn’t support this yet or if Philips just hasn’t implemented it. Sounds like a software thing so it can easily be corrected.

The last thing to set up was Family Sharing, which started out pretty well. I quickly added my wife and kids to our home and they received the notifications. At some point I received a notification that I needed to set up either an iPad or Apple TV in order to access HomeKit from outside of our home network. I followed the directions for setting it up on the Apple TV, but wasn’t able to see the correct setting show up. On my iPhone I looked for the Home setting that appears on the iPad and couldn’t find it so I tried logging out of iCloud and then logging back in, which caused meant my Photo library had to get reconciled. In the end there isn’t a Home setting on the iPhone and eventually my Home setup propagated to the Apple TV.

I am stilling waiting on the iHome plug, but in the meantime I have been able to play around with Scenes and set it up so I can say “Good Night” to Siri and the lights would turn off. It is taking a bit of getting used to, but so far I haven’t received any complaints from my family about not being able to use the regular switch.

To be continued…

Hue has three different types of standard “shaped” bulbs: Hue White, Hue White Ambiance, and Hue White and Color Ambience. Hue White, the cheapest of the bunch, costs about $15 each, and only supports a single shade of white. The Hue White Ambiance costs about $30 each and supports over 50 thousands shades of white. The Hue White and Color Ambience, costs about $50 each and supports 16 million colors.

Apple Product Naming Over the Last 10 Years

Over the last ten years Apple has released four new product categories: iPhone, iPad, Apple Watch and Apple TV. In each of these categories they have had various naming conventions for the products. The name of the initial offering for each category was usually straightforward, well with the exception of the Apple Watch and its various editions. As the products started to branch out the names got slightly more inconsistent.

iPhone

The original iPhone was followed by the iPhone 3G, because of support for 3G cellular networks, which interestingly also has caused some people to refer to the original iPhone as the iPhone 2G. After that was the iPhone 3GS, followed by the fourth release, the iPhone 4. It was the third form factor, but fourth phone model. Since then the pattern of incrementing the number for each new form factor and adding an S for the intermediate years. In 2013, the newest phone was named iPhone 5S, but another new C designation was added for the new colorful iPhone 5C, which had all of the internals of the iPhone 5, but had a polycarbonate case. It isn’t clear why the new phone was released, perhaps to differentiate it more from the S model or maybe to try and add more demand for the year old model by making it seem “new”. In 2014, a new form factor was introduced with the expected increment in the number, however a new larger screen became available adding the new + identifier, for the iPhone 6+. Most recently in 2015 the introduction of the iPhone 6S and iPhone 6S+ continued the tradition of using the S identifier for the second year of the same form factor. However, unlike last time a new C model was not introduced along side the S model and instead the iPhone 6 remained available.
GenerationMarketing NameAlt. Names
1iPhoneiPhone 2G
2iPhone 3G
3iPhone 3G S
4iPhone 4
5iPhone 4 S
6iPhone 5
7iPhone 5 S
8iPhone 6
9iPhone 6 S

iPad

The original iPad was followed by the iPad 2 in March 2011. So far so good, right? The following year a new iPad was announced with the same form factor, but a new retina display. Apple referred to this model as “new iPad”, however most people refer to it as the iPad 3 or 3rd generation using the old iPod naming convention. A short seven months later Apple announced the next iteration of the iPad, which was marketed as “iPad with Retina Display”. The form factor remained the same as its predecessor, this version was also referred to as iPad 4 or 4th generation. At the same event Apple also announced a new smaller iPad called the iPad Mini, similar to the branding used on the first smaller iPod Mini. In 2013, a new thinner form factor with a smaller bezel was introduced with a new name, the iPad Air. The Air name had been used for the ultra portable line of MacBooks first introduced in 2008, which were much smaller than the existing MacBook and MacBook Pro models. The overall size of the device was noticeably smaller compared to the previous models, which may be the reason for the new naming convention. At the same event in 2013 the new “iPad Mini with Retina Display” was announced as the successor to the iPad Mini. The following year the iPad Air 2 and iPad Mini 3 were announced, while the form factors were the same as the previous generation the internals were upgraded. At this time the previous generation iPad Mini with Retina Display”” was given a new designation of iPad Mini 2. In September 2014, Apple announced the highly anticipated iPad Pro with a new 12” screen. At this point Apple seems to have settled on using Mini, Air and Pro as the names for the different screen sizes, they then just stick a number on the end based on which generation of the current name.
GenerationMarketing NameAlt. Names
1iPad
2iPad 2
3new iPadiPad 3, 3rd Generation
4iPad with Retina DisplayiPad 4, 4th Generation
5iPad Air
6iPad Air 2

MacBook

I could go over the many various names for Apple laptops over the years, PowerBooks, iBooks and MacBooks, but this will focus on the MacBook. The first MacBook was the MacBook Pro announced in January of 2006. The polycarbonate MacBook was announced the following May. These two were updated once or twice a year until January 2008 when the new thinner MacBook Air was announced. 

Going forward the three different lines have been maintained with the MacBook Air being the smallest model, the MacBook Pro being larget more performing model and the MacBook being the same size as the MacBook Pro, but cheaper and less powerful. In 2012, things changed a little with the introduction of the Retina Display on the MacBook Pro, as these were rolled out there was a choice between the MacBook Pro and the MacBook Pro with Retina Display. At some point the MacBook disappeared and the MacBook Pro 13” was added. Most recently in 2015, the new MacBook with Retina Display, was released, which is actually smaller than the MacBook Air. Unlike iPhones and iPads the various MacBooks of the same line are differentiated using the date they were initially released.

The Apple Devices

The other devices I will mention are the Apple TV and Apple Watch. Both of these start with Apple, well technically there name starts with the Apple logo. The Apple TV was originally introduced as iTV, but was changed before it shipped. It has had a few different iterations, but generally it is just referred to using an understood “generation” nomenclature. The Apple Watch is still on the first generation, so whether it gets the numbered system like the iPhone and iPad or if it just gets the generally accepted “generation” nomenclature hasn’t been determined yet.

In Conclusion

It is often confusing and not logical the way these various products have been named, but I think it is bound to happen in an industry where it is difficult to foresee how a product category may change. It is also hard to judge some of these names without knowing what products are to come. I think some of the naming has to do with the target consumer and market. The phones are much more mainstream and they need a clear naming convention so the average consumer can figure out the difference between the various models.

As for the use of Apple in the front of Apple Watch, I think this is the new direction and if they could go back in time I think the iPhone would have been named Apple Phone. The i naming thing seems so dated and has also opened up a pandora’s box for third party companies naming their stuff with the i prefix. Using the Apple prefix also prevents any trademark issues like they experienced with the iPhone.

Finally, I am really interested to see when they decide to drop the numbering scheme from the iPhone and iPad names. It will sound completely ridiculous when they release the iPhone 11 or iPad Mini 14. I wonder if by then the products will be so mature that it will be released in a similar to manner as the MacBook, with random releases every year having only minor performance improvements with major form factor changes every 4-5 years.

UPDATE: After more consideration I wonder if the numbering scheme is also a result of how the specs of the mobile devices are somewhat obfuscated from consumers.  If you try to buy a MacBook Pro they don’t break them down into different numbers even when there are a couple generations available, instead we can rely on the old processor speed, storage, memory and display quality properties to pick the device that is right for you. Perhaps it is just another side effect of the simplification of computing devices, if the operating system is going to be easier to use than it only makes sense that buying one should be less confusing too.

Tips for iOS Device Enjoyment

Here is a list of the first things I do when I get a hold of somebody’s iPhone or iPad when they are looking for advice on how to set up their iOS devices.  After completing the following you should have a better experience with your iOS device.


  1. Upgrade to a paid iCloud storage plan.

    The free 5GB storage option is nice when you get started, but after you have lots of photos on your phone OR have two devices this space runs out quickly and will give you the dreaded “Unable to back up your device because you don’t have enough iCloud storage.”  Apple recently revised their storage tier pricing so you can get 50GB of storage for $0.99 per month (less than $12 per year).  This space can be used to store all sorts of things, but most people will use it for the back up of their devices and for their photos.

    To upgrade your storage plan just do the following:
    - Go to the Settings app
    - Navigate to the iCloud settings
    - Tap “Storage” setting
    - Tap “Change Storage Plan”
    - Tap the storage plan of your choice and tap Buy
    - You will be prompted to enter your iTunes password and will then be billed monthly.
  2. Turn on iCloud Photo Library

    One of the biggest culprits of the “Not enough space available” message is Photos and typically you see this message when trying to take a photo.  The gut response is to go to the Photos app and start deleting photos to make space, which will most likely cause you to make hurried and rash decisions.  You may find that when you have more time you will take the photos off of your device and put them on a computer, which works for a time, but then you don’t have access to them on your phone anymore.  The iCloud Photo Library will put a copy of all the photos on your device onto Apple’s servers.  The photos will take up your iCloud storage space, but if you completed step 1 above then you will be able to store plenty of photos.  The added bonus is you can see all the photos on any iOS devices you are logged into and will also be able to view them at iCloud.com.  Your “Not enough space available” issue will also be resolved, because as your device starts to run low on space, the device will start to clean up any of the full versions of the photos that are on the device that are also on Apple’s servers.  You will always have small versions (thumbnails) of your photos on your devices, but no matter what the full version will always exist in the server, only to be downloaded to your device if you try to view it.

    How to enable iCloud Photo Library
    - Go to the Settings app
    - Navigate to the iCloud settings
    - Tap the Photos item
    - Flip the switch to turn on the “iCloud Photo Library”
    - Choose “Optimize iPhone Storage” if you have a small phone and lots of photos.
    - It will take a while for it to upload all your photos.  Go to iCloud.com and you can see how it is progressing
  3. Turn on iCloud backup

    One of the most common features that people typically have turned off is the iCloud backup.  I often talk about this by saying, “I could take my phone and throw it into a river right now, go to an Apple store, buy a new phone and within minutes be up and running with everything exactly the same.”  Now of course that is a doomsday scenario, but this comes in handy when you get a new phone, because the first thing it asks you is whether or not you want to restore from an iCloud back up.

    How to enable iCloud Backup
    - Go to the Settings app
    - Navigate to the iCloud settings
    - Tap the Backup item
    - Turn on the back up
  4. Change the name of your device
    I would always get confused in the past when looking at a list of my devices somewhere either in the Find my iPhone app or with back ups regarding which actual device it was talking about.  I used to just say “Keegan’s iPhone”.  Starting with my iPhone 5, I actually went in and updated the name to “Keegan’s iPhone 5” so if I updated to the iPhone 6S I would know exactly which phone it was talking about.

    How to update your device name
    - Go to the Settings app
    - Navigate to General > About
    - Tap the Name field and update your device name to the actual model number.

The Mystery of iCloud Photo Library Optimization

To say I was thrilled with the introduction of the iCloud Photo Library is an understatement.    I have been waiting for this type of single source library for years.  Of course I immediately turned it on for all  my devices and went all in (not completely in Photos for OS X, because my library was all referenced and it is a slow process moving them over).  I was also excited about the cool Optimize Storage option in iOS because in 2012, when I bought my iPhone 5, 16GB seemed like plenty of space.  

However, as I soon found out the Optimize Storage option would cause me more stress than I anticipated.  You see Apple decided that the optimization would be completely automatic with no opportunity for manual intervention for the user.  There is clearly some sort of algorithm that determines what full size versions of photos to keep on the device.  So far one of the rules revolves around photos taken within the last 30 days and there is also one based on photos that were downloaded locally to the device in the recent past.  It seems that no matter how low the available storage level goes the full size of these photos will remain on the device.  

I learned this because the other day I tried to take a video of my son playing baseball and got the dreaded “Video couldn’t be saved because of insufficient space” message. My heart sunk because I thought barring some insane offline photo taking spree this error would never appear on my devices again.  My expectation was that in the worst case scenario if space was running low (as in I didn’t have enough space to take one picture) that the “Optimize” setting would delete ANY photos that had already been uploaded to the cloud.  I figured maybe there were tiers:
if (availableStorage > 500MB) then don’t do any optimization
if (available Storage < 500MB && availableStorage > 250 MB) then get rid of any full size copies of photos from more than 30 days ago that have been uploaded to the cloud
if (availableStorage < 250MB) then delete any full size photos that have been uploaded to the cloud

No such luck though, it seems to insist on keeping some amount of full size photos on the device even if they exist in the cloud.  I was bit by this recently because about 2 weeks ago I went on a trip and recorded a bunch of video, which went up to the cloud nearly the same day.  However, now the 1GB of videos from last month sits on my device and I have no way of deleting it without also deleting the copy in the cloud too.

I tried all sorts of trickery like trying to delete the photos using the Image Capture app on my MacBook.  I turns out the delete functionality isn’t available if iCloud Photo Library is turned on for the device.  So I tried turning off the iCloud Photo Library on the phone and while the delete button appeared in Image Capture it didn’t really do anything.

In the end I found the best way to get me back some space was to turn off the iCloud Photo Library on my iPhone, which freed up some space because it removed all the iCloud Photo Library thumbnail photos, but all the full size photos were still on the device.  At this point I was able to use the Photos app on my iPhone to remove photos and videos from my device, but not from the iCloud Photo Library. I also had to delete them from the “Recently Deleted” album too. Once I got rid of some of the videos that had been taking up so much space I turned the iCloud Photo Library back on and it started downloading the thumbnails again, but I now have a 1.5 more GB of free space on my iPhone. 

Finally My iPhone 4

After a long month and a half wait I finally have my iPhone 4. It all started back on the first day of pre-orders. I tried and tried to order one online with Apple and AT&T, but was never able to get through. I decided to try a lesser known method and reserved one at Radio Shack, but not just any Radio Shack the only one on Cape Cod; the place I would be on launch day. Fast forward to launch day, I go down to the Radio Shack and they only received four iPhones and I wasn’t in the top four on their reserve list. So the waiting game begins. All the Apple stores are not selling to people unless they are on the pre-order/reserve list and I assume at this point the list is getting long. I could order one from Apple, but it is going to take several weeks. AT&T started the first come first serve purchasing, but I totally missed the boat on it. Then on our way to New Jersey I get a call from the Radio Shack on Cape Cod letting me know they have an iPhone 4 for me. Unfortunately, I have to pass, for now, since we are headed in the wrong direction. A week later we are still on the Jersey Shore and I get another call about another iPhone 4 for me. Again I have to pass.

Finally, this morning, a mere two seconds from mentioning the lack of a call, the friendly Rebecca from the Orleans Radio Shack calls and I finally verbally accept the iPhone 4. The only problem is: 1. Orleans is over 2 hours away from my house and 2. Cape Cod traffic is famous for being horrible on the weekends. I take a quick look at Google Maps and decide to wait until later in the day. Finally around 4pm the traffic starts to lighten up and I plan to leave at 5pm. For some reason traffic through the heart of Boston continues to be red and I decide to add an extra 20 miles by taking a loop around the city on RT 128. It ended up taking only 2 hours and 15 minutes, which was about 17 minutes faster than Google Maps predicted. The time would have been better if I didn’t run into some rain on the Cape.

I spent about 30 minutes in the store activating it before going over to a local coffee shop to load the iPhone from a back up of my old iPhone. Here is one place where the iPhone shines, within a couple minutes I had loaded from the back up and all of my contacts, apps, music, email settings, ringtones, and almost everything else was automatically setup exactly like my old phone. All the data from the apps was right where I left it in both my gas app to my calorie counting app. Apple has done a great job with the back up process and the virtually seamless transition between devices. I bought a bunch of chocolate goodies and hopped in the car. So far the iPhone 4 has been great, my only complaint is with the included headphones and how difficult it is to put them into the headphone jack. I don’t know if the pair I received is defective or not, but it was hard to put them in and also proved even harder taking them out. I might have to stop by the Apple Store next week and get some replacements.

Five Bars At Last

The saga for setting up my AT&T 3G MicroCell has come to an end.  Today I gave the support line another call and spoke to Adam.  I told him my story and he said they had fixed the activation in the middle of the week and I shouldn’t have any problems related to activation after last Thursday.  I also asked him about whether or not activation involves the device because the previous guy told me it did not.  Again he corrected what the other tech had said and told me it would only be activated once the device connected.

I went through the exercise of submitting removing the existing device from my account and re-added it under a different name.  I reset it, but still I just got “Activation Pending”. I had read online about problems people were having with their router causing trouble so I connected the MicroCell directly into the cable modem.  I restarted the cable modem and MicroCell and within twenty minutes the 3G light, which had been flashing for days was finally solid.  I ran for my phone and within a few seconds it detected the MicroCell and displayed five bars.  It wasn’t long before a text message and email came through from AT&T telling me the MicroCell had been activated. The activation process definitely involved the hardware connection to complete.  Hallelujah!!!!

The battle was still not over, I now had to figure out how to include my Apple AirPort Extreme router in the mix.  I unplugged everything and connected cable modem->router->MicroCell.  Upon restart and lots of waiting, no dice.  I tried an alternate installation suggested in the documentation cable modem->MicroCell->router.  Restarted everything and voila everything worked.

I made my first call and despite having a “Call Failure” message on the first attempted dial I was able to call my dad and had a good test call.  The call quality was better than before, but still sounded a bit choppy at times.  Of course I don’t know if that was my end or his end.

So for now I will begin testing this crazy AT&T MicroCell device and will put together a review in the coming weeks.
2 Things I Learned While Setting Up My AT&T 3G MicroCell:
1. The activation process will only be complete once the hardware successfully connects to the AT&T network.  Until that happens you will see Activation Pending when looking online.
2. You may need to tweak the settings on your router to make the MicroCell work.  My current setup of modem->MicroCell->router is considered a last ditch effort by AT&T.  I did find an Apple Support Discussion with possible AirPort Extreme settings changes to make it work in the modem->router->MicroCell setup.

iOS 4 on the iPhone 3G Update

Last week I posted an entry about the slowness of my iPhone 3G after updating to iOS 4.  As with most slowness I was starting to get used to it so it didn’t seem so slow, but of course every once in a while I was reminded with an extended wait for a specific app.  So…. last night I decided to attempt a clean restore of iOS 4 to see if the situation improved.  It took about 15 minutes to restore the phone to iOS 4 and then over an hour to reload it from a back up.  Apple really needs to find a way to make syncing between an iPhone and iTunes faster, because it is sooooo slow.  Everybody seems to want over-the-air syncing, but I can’t imagine how this would be faster even if slightly more convenient.  Okay enough about syncing, once all was said and done I unplugged the iPhone and tested it out and it was a bit snappier.  Again this morning I used it and I saw some more improvements in performance, but typically performance seemed better after a fresh restart so I am going to hold my final judgement until later in the day.

Rant Friday

I feel it is my duty to update on the current status of my MicroCell.  Status: Nothing has changed.  My account online continues to say “Activation Pending” and the little green 3G light continues to flash on the device.  I am guessing this will not get fixed by the end of the weekend.  It would be one thing if the device had a subtle design, but instead it is this giant white plastic upside down Y shaped thing.  It doesn’t help that it has to sit next to the router and cable modem, which already sit in our kitchen and the 50 feet of cable total that Apple and the modem company thought people would need (we only need about 2 feet).  The worst part is paying $150 for something to get a signal on my phone and now I still have no service, but AT&T has my money.  Ahhhhh!!!

Now onto my friends at Apple.  I am going to write off this antenna thing for the time being as a lot of media hype and besides I don’t currently get service in most cases anyway (see above), so it isn’t a big deal for me.  However, I do have a new gripe with the fruit company. What is the point of having a store if you can’t buy anything?  The two most showcased items in the Apple Store right now are the iPhone 4 and the iPad.  They probably have 30 of each for demonstration purposes, the problem is if you actually want to buy one, well frankly you can’t.  Now I understand not being able to keep the iPhone 4 in stock, its only been out for a week, but the iPad as of tomorrow will have been out for three months. Ridiculous!!  Maybe I should sell my AAPL stock now before people realize the number of sales of the iPhone and iPad each day at least in the Apple Store in the Burlington Mall are 0.0.  Maybe they should march the neglected Macintosh computers out into the spotlight and get people to buy some of those instead of just teasing people into liking a smartphone or tablet they can’t even buy.  On the bright side maybe those people will be turned on to touch screen smartphones and go buy a Droid X on July 15th, leaving the next shipment of iPhone 4’s all to me.  Until then I am sticking it out with this super slow iPhone 3G with iOS 4.

To iOS4 or Not To iOS4

A couple weeks ago I upgraded my iPhone 3G to the brand spanking new iOS4.  Of course the feature set gained by this is dramatically smaller than the full bevy of features on the iPhone 3GS or iPhone 4. I was mostly interested in folders, multiple exchange servers and also a unified inbox, so I decided to take the leap and boy have I paid for it.  The phone is nearly unusable now, think of it as running Windows 7 on a Windows 95 era machine.  What formerly was called the “Best iPod Ever”, can barely even launch the iPod app in less than 15 seconds and once it is launched good luck getting it to not crash.  The Maps app opens and then locks up for several seconds before you can actually pan and zoom. Of course there is a short term solution for the problem which involves restarting the phone a couple times a day.

This would all be okay if I could actually find a store with the iPhone 4 in stock, but who knows when I will be able to find one.  I am now left with the decision of dealing with this slowness and leveraging the iPad as often as possible OR following some undocumented steps to revert my phone to iPhone 3.1.1.  Are the few features I get with the iOS 4 worth the trouble?  At the current time I am leaning towards NO and will probably do the downgrade soon.  If anybody else is having a similar problem here is a site with the Steps to Downgrade an iPhone’s firmware.

The AT&T 3G MicroCell Installation

Ever since I brought home the iPhone 3G back in 2008 I have been living with little to no service at my house. At first this seemed odd to me considering I could see a tower from my house, but apparently AT&T doesn’t use that tower. Instead it appears the nearest tower is behind a hill or somewhere that makes me live in a dead spot.


Enter the 3G MicroCell. As I began researching ways to improve my service, I found some blog posts about how AT&T was testing mini cell towers that you could buy and hook up to your internet to make calls. Of course they weren’t testing near me so I had to wait until yesterday when I found they were finally available in our area. I went to an AT&T store right after work, purchased the little guy for $149 and rushed home to get it all hooked up.

Here are the basic steps:
1. Log on to att.com and activate your MicroCell.
a. Entering the serial number.
b. Coming up with a clever name for your device.
c. Setting up a street address.
d. Giving specific phone numbers that can use the device.
2. Hook up the hardware
a. Plug in some internet.
b. Plug in some power.
c. Put it near a window so it can connect to GPS for E911.
d. Wait 90 minutes.

It all seemed simple enough right, wrong! I figured the online registration would be the easiest part, but of course I forgot my experiences of two weeks ago when I tried to pre-order an iPhone from AT&T. First of all the website asks you to log in constantly and always puts you back to the beginning of a “wizard”-like page flow. I logged in to activate the 3G MicroCell, verified my address, entered a clever name for the MicroCell and then submitted. After about two minutes giant red text appeared telling me my request timed out and I needed to try again later. I ate some dinner and “tried again later” only to receive the message again. As any user is likely to do I hit it a couple more times for good measure and it changed to some sort of confirmation message. Weird, especially since I didn’t receive a text or email as I would expect. I assumed at this point all was good and hooked up the hardware. I came back after fifteen minutes and was happy to see the GPS had locked on (previously this had been my biggest concern). After 90 minutes I returned to see the 3G light was still flashing, so per the troubleshooting instructions I restarted everything and waiting. Thirty minutes later and the light was still flashing. Grrrrrr. I went to bed and left it running hoping I would come down Christmas morning style to a solid 3G light.

As one might expect from AT&T at this point it was not working and my iPhone still had only one bar. I went online and looked at my MicroCell’s settings page and noticed that it said “Activation Pending”. I wondered if this was completely related to the setup part on the web site or if it was something that would only get set to complete once the damn 3G light stopped flashing. Once I was at work I called AT&T and the guy on the phone claimed the entire network was down. Upon further investigation I think they are just bogged down with activation requests. Either way I can’t mess with my router from here so it will have to wait until tonight when I waste yet another evening trying to figure this out.

The best part is going through all of this and paying all of that money just to get my phone to work like it should anyway.